Cleaning mussels properly is the key to enjoying this delicious seafood safely. Mussels are filter feeders, which means they can accumulate sand, grit, and bacteria from the water they live in. Before cooking, you must clean them thoroughly to remove any impurities. This process ensures not only a better-tasting dish but also helps avoid any potential foodborne illnesses. Whether you're steaming them with garlic and wine or adding them to a seafood stew, learning how to clean mussels correctly is essential. In this complete guide, you’ll find everything you need to know about selecting, storing, scrubbing, and preparing mussels like a professional.
1. Understanding What Mussels Are
Mussels are a type of bivalve mollusc found in saltwater and freshwater environments. They live in clusters attached to rocks or man-made structures, filtering plankton and other nutrients from the water. Edible mussels, commonly the blue or black variety, are widely used in cuisines around the world. They have shiny, elongated shells and a sweet, briny flavour when cooked. Because mussels filter large volumes of water, they can also retain sand, mud, or even harmful bacteria. This makes cleaning them vital. Unlike clams or oysters, mussels are generally farmed, which means they’re usually cleaner. Still, they need proper handling before eating.
2. Buying Fresh Mussels
Freshness is critical when it comes to mussels. When buying mussels, look for ones that are closed tightly. This indicates they are still alive and safe to eat. If the shell is open, tap it gently; if it closes, the mussel is still alive. If it stays open, it should be discarded. The shells should be clean and free from cracks. A fresh mussel should smell like the sea – clean and briny, never fishy or sour. It's best to buy mussels from reputable fishmongers or markets with high turnover. Avoid pre-bagged mussels sitting in water, as they may spoil faster.
Check out this blog: Cold Water Seafood- An ultimate guide
3. Storing Mussels Before Cleaning
Once you’ve purchased fresh mussels, it’s essential to store them correctly until you’re ready to clean and cook them. Mussels should never be stored in airtight containers or submerged in water, as they need to breathe. Instead, place them in a bowl covered loosely with a damp cloth or paper towel. Keep the bowl in the refrigerator. Ideally, you should use them within 24 hours, but they can be stored this way for up to two days. Always check them again before use – if any have cracked shells or a strong odour, discard them immediately.
4. Tools You’ll Need
Cleaning mussels doesn’t require fancy tools, but having the right items makes the process easier and more effective. You’ll need a large bowl, cold water, a stiff brush (like a vegetable brush), and a small paring knife or your fingers for debearding. A colander helps for rinsing. It’s also helpful to have a clean towel on hand. Avoid using soap or chemicals – mussels are delicate and should only come into contact with clean, cold water. These simple tools will allow you to scrub away grit and remove the beard without damaging the shell.
5. Rinsing Mussels Under Cold Water
Start the cleaning process by rinsing your mussels thoroughly under cold running water. This helps remove surface dirt, mud, or any debris. Avoid using warm or hot water, as it can kill the mussels. Hold each mussel individually under the tap and inspect for damage. Discard any mussels that are cracked or remain open after a light tap. Rinse until the water runs clear and no visible grit remains. This initial rinse is the first step in ensuring that your mussels are clean and ready for scrubbing and debearding.
6. Scrubbing the Shells
After rinsing, the next step is to scrub each mussel. Using a stiff brush, scrub the shell to remove barnacles, sand, and other debris. Pay close attention to the hinges and edges of the shell, where grit can hide. Some mussels might have seaweed or other natural matter attached – these should be gently scrubbed off. Be firm but careful not to break the shell. Clean shells not only look better but also prevent dirt from getting into your cooking liquid, ensuring a clean and delicious final dish.
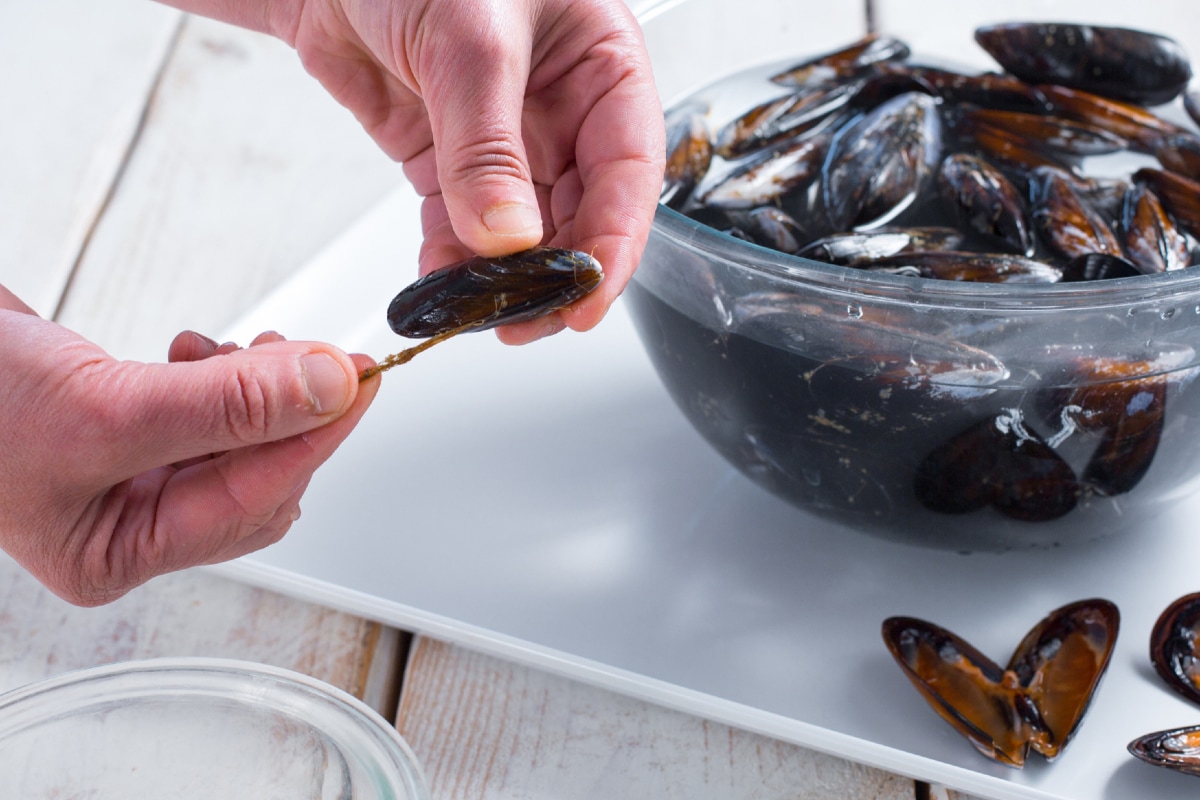
7. Removing the Beard
The “beard” of a mussel refers to the fibrous threads it uses to attach itself to rocks. This part isn’t edible and should be removed before cooking. To debeard a mussel, hold it firmly in one hand and use your other hand or a knife to tug the beard towards the hinge. It might take a little force, but it should pull away cleanly. Some farmed mussels may come debearded, but it’s always good to check. Removing the beard improves texture and presentation, and prevents an unpleasant stringy bite during your meal.
Buy fresh seafood near you: Best seafood store in new york
8. Soaking Mussels to Remove Sand
Although most farmed mussels contain less grit, soaking them can help flush out any remaining sand. Fill a bowl with cold water and add a tablespoon of salt for every litre. Let the mussels soak for 20–30 minutes. As they sit, mussels naturally expel any sand or particles trapped inside. You might notice some sediment settling at the bottom of the bowl – that’s exactly what you want. After soaking, lift the mussels out (don’t pour them out) so the dirt stays behind. A final rinse under cold water finishes the process.
9. Sorting and Discarding Bad Mussels
During cleaning, it’s crucial to inspect each mussel. If a mussel has a cracked or broken shell, it should be discarded. Mussels that remain open even after a firm tap are likely dead and unsafe to eat. After cooking, any mussels that didn’t open should also be thrown away. Live mussels should react to handling – if they seem inactive or emit a foul smell, it’s best to err on the side of caution. A careful inspection ensures you only cook with safe, healthy shellfish.
10. Tips for Preparing Clean Mussels
Once your mussels are cleaned, they’re ready for cooking. Keep them cold until use and prepare them as close to mealtime as possible. Don’t add them too early to stews or broths – they only need a few minutes to steam open. Mussels are best cooked simply, with garlic, herbs, wine, or cream. Avoid overcooking, as they can become rubbery. Cook them in a wide pan so steam can circulate. Discard any mussels that don’t open after cooking. Proper cleaning combined with smart cooking ensures every mussel on your plate is safe and tasty.
11. Why Clean Mussels Thoroughly?
Cleaning mussels is about more than appearance – it’s about safety and flavour. Mussels can harbour harmful bacteria or parasites if not cleaned properly. Grit and sand can also ruin the texture of a dish. Even if you’re in a rush, skipping the cleaning step isn’t worth the risk. Thorough cleaning removes debris, improves taste, and ensures you’re serving something delicious and safe. It also enhances the look and texture of your dish, making your seafood meal more enjoyable. Taking the time to clean mussels well shows care and attention in the kitchen.
Comments on “How to Clean Mussels – Complete Guide”